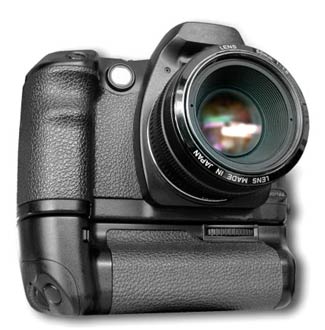
The Camera - 1
How does a camera work?
General structure
Short Summary:
A camera
- is light-tight against unwanted light
- has a sensor for recording light (or is equipped with film)
- has an opening (usually a lens) to let the wanted light to the sensor
- has (usually) a shutter to control the duration of exposure
- has (usually) an adjustable aperture to control the amount of light
- has (usually) a device for adjusting image sharpness
- has (usually) a viewfinder and/or display
In Detail:
To take photographs, you need a kind of camera. So, if you want to learn photography, it is certainly helpful to become familiar with the basic structure and important functions of a camera.
Let’s look at everything from the start.
A camera is of course meant to take photos, i.e. let light reach the sensor (or the film). But it is equally important to protect the sensor (or film) from unwanted light during exposure.
Box
For this, the camera has to be a light-tight box. Only the light from to the subject should reach the sensor during exposure. And in an analog camera, the film also has to be protected from light between the shots.
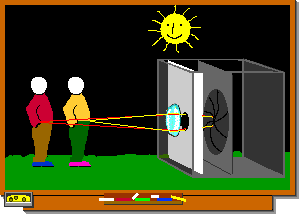
A simple box or, for example, a shoebox with a piece of film inside would suffice as a simple camera. But to take photographs, you definitely need more: on the one hand, a subject (e.g. a person) and on the other hand, light that illuminates the subject (e.g. from the sun).
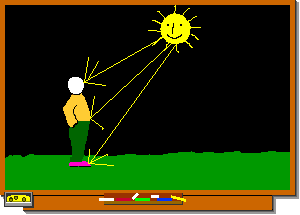
The light falling from the sun on the subject, in this case the person, is reflected back in many directions. If we place our box camera in front of it and open the lid, i.e. make a shot (an exposure), the light reflected from a point on the person hits many different points on the sensor (or film).
This only results in an even exposure of the sensor and not yet an image of the person. The light has simply fallen onto the sensor in a disordered way.
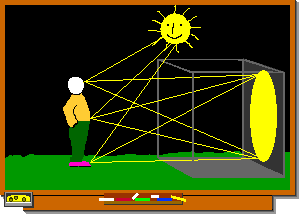
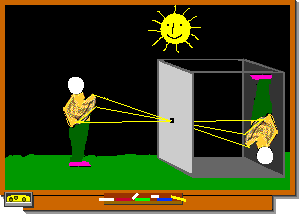
Hole
To order the light, we can try using a smaller opening on the box. For this we have to put a small closable hole (the pinhole) in the front of the box. The light can now be “sorted” or filtered by this hole.

While fewer lights reach the sensor or film, it is directed. From each point of the subject “seen” by the camera, only one “light beam” now reaches the sensor/film. This “beam” only creates one point.
These points (not to be confused with the pixels of the digital sensor) make up the image of the subject. We now have a simple camera, a pinhole camera. (You can build such a camera yourself with a cardboard box, tape, and a piece of film or photo paper. For the start you can use aaluminum foil for creting a small hole.)
However, the opening in the box must not be too large. Otherwise several light rays from one point on the subject will reach the sensor/film and produce circles (known as circles of confusion) instead of the desired points. This causes the points of individual subject details to overlap, the boundary of detail becomes blurred, and the image becomes less sharp.
So the hole has to be small. But with a small hole, only a little amount of light reaches the sensor. Therefore, you have to let it reach the sensor for a longer time so that the camera can record enough light. You have to expose for longer.
Unfortunately, these long exposure times also have disadvantages. Anything that moves during exposure creates a kind of light trail across the image. Points turn into streaks and “smudge”. This leads to blur again, this time caused by the movement of the subject during exposure.
So it is important to let in more light to the film. But at the same time, we must prevent the blur (by bigger circles of confusion) of a larger opening. We therefore cannot simply enlarge the hole.
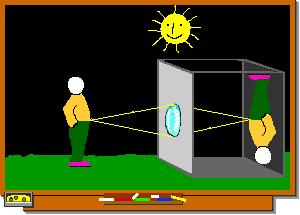
But instead, to gather more light on the film, we can use a lens.
Is it blurry or improperly focused?
It is sometimes not so easy to determine whether an image is blurry due to camerashake oder motion of the subject or because it is simply not properly focused.

In a blurry image caused by camera shake, more or less everything is blurry. But the strongest effects are shown in the foreground of the image.
If it is motion blu only some parts of the image are blurry — only the parts that have moved during the exposure time.
With an incorrect distance setting, a distance range is still sharp and the blur grows to the other objects that are further away from this range.
Of course, combinations of these various types of blurs can also occur. Then it will of course be a lot more difficult to analyze the cause.
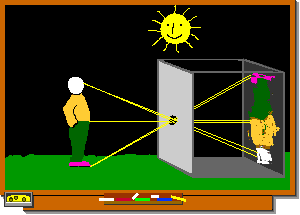
Lens
At the transitions from air to glass (and vice versa), the light is refracted, appearing to be “bent” at those points. If it is bent enough, the light rays from a point on the subject can be prevented from reaching the wrong areas of the image.
Instead they can be directed so that they converge at a single point, allowing multiple light rays to be used to depict a subject detail in one point on the film or sensor.
This gives us more light for that region of the sensor and enables us to use shorter exposure times. The light is collected and brought to a single focal point by using a simple lens.
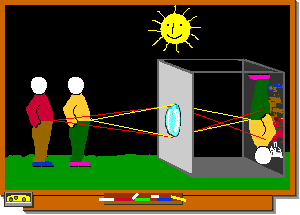
Unfortunately, however, with this method, only objects with a uniform distance from the camera can be focused sharp, because the distance between lens and focal point depends on the distance of the subject to the lens.
For a sharp image we need the focal points on the image plane. Objects that are too far away have a focal point in front of the image plane.
On the other hand, objects that are too close have a focal point behind the image plane. In both cases, instead of sharp, focused points, larger or smaller, blurry circles appear on the image, depending on the distance.
Objects that are too far away have a focal point in front of the image plane. On the other hand, objects that are too close have the focal point behind. In both cases, instead of sharp points, only more or less large and blurry circles of confusion appear on the image, depending on the distance.
This can be a disadvantage, but also an advantage, because the blur can also be artistically desired in order to hide distracting image elements.
In any case it is important, that you can influence the position of the focus (the plane of focus) in the subject by changing the distance between the lens and the sensor plane. If we increase the distance of the sensor/film from the lens, closer objects will become sharp. If we reduce this distance, distant objects will become sharp. So we can control the focus.
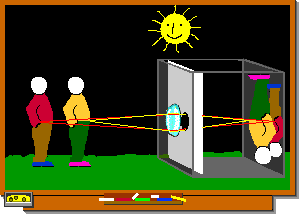
And if we use a combination of hole (aperure) and lens, the circles of confusion for subjectdetails out of focus can be reduced by reducing the opening of the hole/aperture.
Objects outside the actual plane of focus will then appear more or less sharp. In this way, we can clearly depict larger areas of the image both in front of and behind the plane of focus.
If the hole (the aperture) is of adjustable size, you can control the extent of the focus into the depth, the so called depth of field. But at the same time, you are also changing the amount of light that reaches the sensor or film. However, the sensor or film needs a certain amount of light to be properly exposed.
To compensate for the different amounts of light depending on the aperture and brightness of the subject, you need to expose for different lengths of time.
With a pinhole camera the exposure times even for brightly illuminated subjects are so long that you can easily measure them with a clock. (Pinhole photographers could measure the exposure time in drunken cups of coffee). In the opposite with lens photography one usually only needs very short exposuretimes (fractions of seconds). The control of these shutter speeds is best performed by a mechanical (or electronic) shutter.

We have now learned the most important elements of a camera. Firstly, it must be light-tight and should have a regulatable and closable aperture. Furthermore, most cameras have a lens, a means of focusing, a shutter with a trigger, and, in the analog realm, a device for transporting the film from one picture to the next. And of course, almost all cameras, unlike our box, have a viewfinder (or an alternative display that can be used). More about this on the following pages.
Today, many of the controls are automated or motorized. Automatic exposure with automatic control of aperture and automatic control of exposure time, automatic focusing and in digital cameras an automatic control of sensitivity. Whether that makes sense or not, you will have to find out for yourself. If you really want to learn photography, I recommend that you use a camera that allows for “manual” photography (manual exposure). Of course, this can also be a “digital” camera, but it should be able to be adjusted by hand.
Although there is a lot of fuss made about the camera and its “features” in advertising and the trade press, in essence all cameras are basically the same. On one side of the housing, light enters the camera housing more or less under control, on the other side this light is recorded.
In the analog realm, therefore, they are more or less just boxes for the light-protected storage of the film. Their influence on the technical quality of the photo is usually significantly lower than that of the lens.
With digital cameras, on the other hand, it’s completely different. The “film” is permanently connected to the camera housing. And this sensor strongly influences the image quality and the usability of the camera. (For this reason, there is also a separate extensive section on “digital” in the “camera” topic area.)
Unfortunately, with all these features one thing is often overlooked: The photographer makes the picture, the camera is just the tool.